Friday, February 28, 2014

Chicken with Bell Peppers

Weekdays are always busy. Coming home from work famished, dinner needs to be done as quickly as possible. When I say quickly, I mean less than 30 min. 20 min is even better.

This chicken is done under 30 min.


Either buy chicken on your way home from work or remember to take out the chicken from the freezer to thaw it in the morning before you leave for work. I usually take the chicken out from the freezer in the morning. Then, when I come home in the evening hungry, I can get to work immediately without waiting for the frozen chicken to thaw.


Not a fan of bell peppers? You can substitute it with broccoli or green beans. Since I am making only one thing for dinner, I like to meat and some veggies in it.


For 2-4 servings, you need:

1 lb chicken (boneless, skinless breasts or thighs cut into small 1" pieces)
2½ tablespoon minced garlic
1 tablespoon fresh ginger, grated or paste
1½ medium onion, finely diced [Small pieces will cook quickly, hence less cooking time]
1 red bell pepper, chopped
1 green bell pepper, chopped
1 tablespoon all-purpose flour [ Use gluten-free all purpose flour to make this GF ]
3 tablespoon white oil
salt

Sauce:
2 tablespoon tamari (soy sauce) [ For GF, use gluten free tamari]
1 tablespoon white vinegar
½ tablespoon cornstarch
½ tablespoon sugar
1½ teaspoon cayenne

How:

Heat a skillet with 2 tbsp oil on med-high to high heat. Higher heat reduces cooking time. However, use the heat level at which you can cook comfortably. If you have all this ready before start, use high heat. If you are prepping while cooking (as I do), use med-high heat.

Coat the chicken pieces with 1 tablespoon of flour and salt for seasoning. Add it to the heated oil and fry for 5 minutes, turning them around the pan until they are nicely browned.

While the chicken is browning, chop the onion. Remove the chicken pieces from the pan and keep aside. Add rest of the oil to the pan. Add the onion and fry till they are translucent. While the onion is cooking, get the ginger and garlic ready. Add it to the onions, season with salt, and fry for another 5 min or till the raw smell is gone.

Add the chicken back into the pan. Add the sauce and the chopped bell peppers. Stir and mix properly such that the chicken is coated with the onion and sauce. Put the lid on your pan and simmer for another 5 min till the sauce has thickened and the chicken is cooked all the way through.

Taste for seasoning. Serve hot with rice or noodles.


Enhanced by Zemanta

Tuesday, February 25, 2014

Sunny Side Up on Potatoes

I was home alone because the other half was in San Francisco conferencing. I woke up very late and wanted to treat myself to a wonderful breakfast or brunch. Nothing better than eggs, potatoes and bacon. As much as I like fried potatoes but hash brown is my favorite.


So, while my bacon was getting perfectly crispy in the oven, I grated some potatoes. Chopped some onion and tomatoes. Made a bed of hash brown, placed a perfect sunny side up egg on it, add the tomato and crispy bacon pieces, sprinkle chopped cilantro, season with salt and pepper and you have your breakfast ready in 30min. Oh, what a treat!


Oh, that perfect morsel- bacon, tomato, hash brown with little bit of the runny yolk.


Warning- I don't use oil in making any of it. Oops! I use bacon fat :)

To make this wonderful breakfast/brunch, you need (for 1 serving, can easily be scaled up):

1 medium size Russet potato, grated using a box grater
1 small yellow onion or half a medium onion, chopped
1 small tomato, chopped
1 egg
2-3 strips of thick cut bacon or as many as you like
salt and pepper for seasoning
Chopped cilantro or parsley

How:

Line a baking tray with foil and place the baking strips an inch apart from each other. Place it in a cold oven and turn it on to 400°F. Putting the  bacon in a cold oven and then turning it on is the key to perfectly crispy bacon. The bacon should be perfect in about 17-20 min. Keep an eye on them so they don't burn. The time depends on how long your oven takes to reach the temperature. Take the bacon strips out of the baking tray and drain on paper towels. Let it cool.

While the bacon is getting perfectly crisped in the oven, grate the potato, chop the onion, tomato and some cilantro. Put the grated potato in cold water to prevent them from turning brown. When ready to cook, put the shredded potato in a cheesecloth and wring out all excess water. The more its dry the more it will be crispy. Although here, I didn't make them crispy (enough crispiness from bacon). But you can.

Put about a tablespoon of bacon fat from the baking tray on to a small pan on medium heat. Add the onion. Fry for a min and then add the shredded potatoes. If you want them crispy, then lay them in a single layer and don't disturb. Let it crisp up on one side for 2 min and then turn over like a pancake.  If you want mushy, like I have here, fry the shredded potato with onion stirring them until they are brown. Season with salt and pepper. Place the potato on a plate.

Add a teaspoon of bacon fat to the same pan on medium heat. Crack a fresh egg on to the pan. Be careful not to get any shells in there (I need not say that!). Cook till the white part is no longer slimy. Place the egg on top of the potato you plated earlier.

Add the crispy bacon (I just break it into small pieces), chopped fresh tomato, cilantro. Season with salt and pepper and enjoy!


Enhanced by Zemanta

Friday, February 21, 2014

Sweet Tomato Chutney with Dates and Mango Fruit Leather


Well, that's a long name. But you have to understand that I had to. Without the dates and the mango fruit leather, it will be a simple tomato chutney not an extraordinary one. And I had to point it out, you see?


I am quite confused by the terms "relish" and "chutney". In Indian cooking, the term "relish" does not exist. We only have chutneys. Sweet ones, spicy ones and sometimes in between.

According to my understanding, relishes are usually made of pickled vegetables. For example, in North America, relish is a pickled cucumber jam. Chutneys can however be made of fruits and vegetables (mango chutney, ginger chutney etc.). Hence, chutney is a specific kind of relish.

All chutneys are relishes but all relishes are not chutneys. Quite like, all thumbs are fingers but not all fingers are thumbs. Sorry that's a little weird thought to put it here! But you get it, right?


Now if I may call my recipe a chutney- it has vegetables and fruits. Vegetables: tomato, ginger. Fruits: dates and mango. Interestingly, in India we enjoy a spoonful or two of chutney just as it is at the end of a meal. Kind of like dessert but not quite. I say not quite a dessert because it is a little spicy and is usually enjoyed in small quantities. Also it pairs very well with a rich and spicy meat or fish dish.

But if you are not an Indian, and not used to Indian meals which end with chutneys, I suggest you enjoy this as you would a jam or a relish. Put it on a toast or on crackers and serve. You'll love it.


This recipe calls for a specific spice mix called "panch phoran"- panch= five, phoran= spice. Five spices are mixed in equal quantities.

Cumin seeds
Fenugreek seeds
Mustard seeds
Nigella seeds 
Fennel seeds

You can buy all these individually, mix in equal quantities and store in an air-tight container or buy pre-packaged panch phoran from any Indian grocery store or Whole foods market (you can find anything in Whole foods- I love it!).

You need (makes 1 cup):

1½ tablespoon of white oil (vegetable or canola)
2 medium size Roma tomatoes, chopped
½ teaspoon of minced ginger
½ teaspoon of panch phoran (described above and where to find it)
1 dried red chili or ¼-½ teaspoon cayenne pepper (add according to your tolerance of heat. I would however suggest not to omit this completely. A little kick takes this recipe to the next level)
pinch of salt
10-12 pitted dates, chopped
¼ cup mango fruit leather, chopped in small rectangles or squares(½ inch size) [optional, but do not substitute with fresh mango] I used homemade fruit leather, learn how to make yourself here.
½ cup granulated white sugar

How:

Heat a small sauce pan on medium heat with the oil. Temper the oil with the dried red chili, panch phoran spice mix and ginger.

When the ginger is fried (will take a min), add the chopped tomatoes, pinch of salt. Stir.

Add half of the sugar to the tomatoes. Add the chopped dates and cook for 5 min or until the tomatoes are cooked down and thickens.

Add the mango fruit leather pieces. Add the rest of the sugar and simmer for another few minutes on low-med heat. Taste for sweetness and heat. Add extra accordingly.

Let the chutney cool. The chutney will thicken further on cooling. Once cool, if you find your chutney too thick, add water to thin it out. On the other hand, if you find your chutney too thin, put it back on the heat for some more time (another 5 min) to thicken.

Serve with an Indian meal or enjoy it with toasts or crackers like you would any jam or relish.

Enhanced by Zemanta

Wednesday, February 19, 2014

Pan Seared Shrimp with Creole Seasoning

If I am very tired, very hungry and I have to cook something, I always find shrimp to come to rescue. Why? It takes less than 5 min to cook. What can be faster than that? Even some of the Lean Cuisine box-es ask for 9 min heating.

Find the recipe for potato fans in the picture here.


Sauté  or stir fry some veggies on the side, and you have a meal for yourself. Or may be boil some pasta (10 min), add garlic to heated olive oil, toss the pasta, add the shrimp- delicious meal in less than 15 min. That's why I love shrimp. Well, and also the fact that I love all seafood, because I am a Bengali (Indian from the eastern part- fish loving people).


I made my own creole seasoning. It has simple ingredients that's already in your pantry, so why spend money buying it.

I followed Emeril's recipe- makes 2/3 cup:

2½ tablespoon paprika
2 tablespoon salt
2 tablespoon garlic powder
1 tablespoon onion powder
1 tablespoon black pepper
1 tablespoon cayenne pepper
1 tablespoon dried oregano
1 tablespoon dried thyme

Mix all ingredients and store in an air tight container.


For preparing shrimp:

1 lb peeled and deveined shrimp (size: 31-40) [I kept the tail-on because it looks good in pictures, but you can definitely take them off. Much easier to eat that way]
2 teaspoon of creole seasoning.
1½ tablespoon butter

How:

Pat dry the shrimp. In a bowl, add the shrimp and the seasoning. Mix properly such that all shrimp is covered with seasoning. Do not add salt, as your seasoning already has salt in it.

Choose a wide shallow pan such that all the shrimp can be cooked in a single layer. Heat the shallow pan with butter on medium heat. Add the shrimp. Cook on one side for 2 min. Turn over and cook for another min till all the shrimp is pink and seared nicely. It does not take long to cook shrimp. Do not overcook shrimp. They become rubbery and chewy- not good!

Serve warm and enjoy with sautéed vegetables or pasta (mentioned above).

Recipe for potato fans here.


Enhanced by Zemanta

Sunday, February 16, 2014

Crispy Spicy Chickpeas


There is something about the teatime in the afternoon. There's got to be something with tea. And it has to be savory or spicy, something crispy and crunchy, not to heavy to fill you up but yet very satisfying.
Pakodas or fritters are quite common afternoon snack to be enjoyed with tea but they are definitely not quite the healthy option. On the other hand is crispy spicy chickpeas-

Spicy- check

Crispy- check

Satisfying- check

Healthy- Oh yes, check


This weekend, with my husband away at a conference, what better way to spend an afternoon than a good book, hot ginger flavored tea and these crispy chickpeas.


These are commonly found in any Indian grocery store. The unflavored roasted chickpeas or the spicy kind. They are very tasty but I always fear that they probably add some food color or preservatives which may not be too good for you. It takes so little effort to make equally tasty snack at home then why not? And the best part is you can control the spices (the level of heat) and make it healthier with less oil. And gluten free (my husband was super happy about this).


You need: 

2 15 ounce cans of chickpeas (I used organic ones to make sure they are gluten free, you can pick any)
2 tablespoon oil
1 teaspoon salt
1 teaspoon cumin powder
1½ teaspoon chili powder or cayenne (Use less for milder heat levels)
1½ teaspoon smoked paprika
½ teaspoon black pepper

How:

Preheat the oven to 375°F

Drain the chickpeas in a colander and wash under running cold water. Transfer on to a plate lined with paper towels and pat dry. This is important to make the spices stick to them and to make them crispy.

Transfer to a bowl. Add all the other ingredients and mix properly, such that all the chickpeas are coated with oil and spices.

Line a baking tray with parchment paper. Spread the chickpeas in a single layer.


Put it in the oven for 1 hr. After an hour take them out and cool. Check if they are crispy, otherwise put them back in for another 10 min. [For the number of times that I have done this, it has taken somewhere between 1 hr to 1 hr and 15 min.]

Cool completely and store in an airtight container. It should have a long shelf life but I would never know. It never lasts more than a week in my house, they are so good :)


Enhanced by Zemanta

Thursday, February 13, 2014

Mango Salsa

I don't want to brag but this is crazzzzy good mango salsa.


Look at those vibrant colors. It's fresh and fabulous. What makes it fabulous is roasted red pepper. And little heat from a jalapeño, crisp red onion and freshly chopped cilantro. Best combination ever. Another great combination of veggies is my Pico de Gallo.


You need:

1½ cups mango, diced. Use a ripe but firm mango.
1 red pepper, roasted or grilled- makes about ¾ cup
1 jalapeño 
½ red onion, diced- about ½ cup
¼ cup chopped cilantro
2 tablespoon apple cider vinegar
juice of ½ lemon
½ teaspoon salt

How:

Roast the red pepper over open flame or in your oven set at broil. When the skin is charred, put the pepper under cold water and peel off the charred skin. Dice the pepper.

Mix all the ingredients in a medium bowl and serve with tortilla chips.

However, I served it with homemade chorizo tacos.


Enhanced by Zemanta

Tuesday, February 11, 2014

Roasted Fennel and Carrot Soup


I am a scientist at a research institute by profession. One day I was at our cafe having lunch with my colleagues and saw that a local farm was advertising CSA. When they were leaving, I was still at the cafe chatting with my colleagues. They stopped at each table to give away the produce that they brought with them. I was eying that basket for sometime now. Well, the basket went to a few tables before it came to ours. By then, the broccoli, the cauliflower, some herbs were gone. What I wanted was this beautiful bulb of fennel with its fronds hanging over the edge of the basket. I was hoping to get it and when the basket reached me, I grabbed it right away. And smiled.


I made this beautiful heartwarming fennel and carrot soup. 

No, I made roasted fennel and carrot soup.

No wait, I made roasted fennel, carrot, potato and onion soup.

Oh, it was so creamy. I wanted to be creamy, but since I was making a dairy free version, I couldn't add cream to it. Hence the potatoes. It was creamy and smooth. Garnished it with some roasted fennel seeds powder and it was perfect!


You need (for 3-4 servings):

1 fennel bulb or 1 cup (throw away the stalks and the fronds except a little for garnishing at the end)
½ medium yellow onion
2 carrots (I had two skinny ones, use one big fat carrot otherwise)
1 small russet potato or half a large potato (Russet potatoes are usually big in size, use half)
1 big fat clove of garlic
½ table spoon salt
1 teaspoon freshly cracked black pepper 
2 table spoon extra virgin olive oil
1 teaspoon roasted ground fennel seeds

How:

Preheat the oven to 400°F.

Chop all the vegetables to ¼ inch thickness. 

Toss them with garlic, oil, salt and pepper and roast them in a roasting pan for 30-40 min, stirring occasionally until all the vegetables are slightly browned and soft.

Put all the vegetables in the food processor and blend them to a smooth paste. Add water to reach your desired consistency. Taste for salt and pepper.

Serve warm garnished with roasted fennel powder and fennel fronds.


Enhanced by Zemanta

Sunday, February 9, 2014

Mango Fruit Leather - Aamshotto

If you walk in to any grocery store in US, you will definitely see many varieties of apples piled up in the fruit section. Green or Greenish kind (Granny Smith, Golden Delicious among others), mix of red and green (such as Gala, Fuji, Honeycrisp, McIntosh etc) and the dark red kind like the red delicious. In total there are 2500 varieties of apples grown in US. But you do not see 2500 kinds of apples in the stores, do you?

I have been going on with apples to lead you to the fact that in the tropical countries, there are over 400 varieties of mangoes grown. Few in US know this as they see only one or two kinds in their supermarket. Growing up in India, I have had at least 10-15 kinds of mangoes-each quite different from the other just like apples.


Last year, when my parents visited me, we went apple picking in a beautiful orchard in Massachusetts. They were thrilled to see so many kinds of apples. It reminded them of their days as a kid when they used to go pick mangoes. Me and my mom brought home 12 lbs of apples. We made apple sauce and apple jam and relished it over the days. When you have a overload of fruits, jams and jellies are good way to preserve them. Another delicious way is to make fruit leather.


Mangoes in US grocery stores do not attract me much. I do not find them ripe enough with a nice mango smell (A ripe mango has a strong smell and can fill the air of your kitchen or a small apartment.).  Hence, when I think of doing something that needs ripe mango, I buy a can of mango pulp from a nearby Indian grocery store. They sell the pulp of alphonso mangoes (the best kind) in a huge can. I usually use a cup to make some mango yogurt  and wonder what to do with the rest. This time I made mango fruit leather. In my mother tongue, it's called Aamshotto. It's difficult to literally translate it. I'll tell you- "Aam" is "Mango".


This just needs one ingredient: Mango pulp (2 cups)

How: 

If you are using fresh mangoes to make pulp, then skin the mangoes, remove the pit, cube the pulp and make puree in your food processor. I would suggest using very ripe mangoes, so that you don't have to add sugar to make it sweet. Note that as the pulp dries to form the leather, it will become sweeter.

Preheat the oven to Warm setting or the lowest temperature it can reach. Mine went as low as 170°F.

Line a baking sheet with oven safe clear wrap. See that excess wrap doesn't hang over the end of the baking  sheet.

Spread the mango pulp (fresh made or from a can) on your baking sheet evenly.

Put it in the oven for 10-12 hours or until you can peel the leather off the wrap. Also, the pulp will be dry on top and not stick to your fingers.

Cut them into strips or rectangles with a pizza cutter or sharp paring knife. Store in an air tight container at room temperature for a few days or in the refrigerator for a few weeks to a month.


Enhanced by Zemanta

Saturday, February 8, 2014

Almond Chocolate Chip Cookies


Love almonds, love chocolate, love cookies. On top of that, these are no fuss cookies. No fancy equipment required. And the best part:

These are easy to make.

These are healthy, gluten free and dairy free.

These are "melt in your mouth" delicious.


Initially these were intended to be for my husband's snacks and these are gluten-free. But honestly speaking, you will not miss the gluten here. I have no gluten intolerance but I love these just as much as any other. 

I have made this from scratch- blanched almonds myself and made a paste. However, you can easily substitute with almond meal. But you will miss the fun of removing the almond skins. Yes, I said fun. Especially if you have kids!


How to blanch almonds and have fun-

Soak almonds in hot water for 5 min. The skin will be soft and can be removed very easily.

The fun part is: If you press one end of the almond with the tip of your fingers, you can "launch" the almond. Shoot it like a rocket to the other side of your room. This is great fun if you don't mind almonds all over your kitchen :)

Now to the recipe:

You need (for 40 cookies):

2 cups blanched almonds (see above) or almond meal
½ cup almond milk (you may use full fat milk, almond milk for dairy free cookies)
½ cup maple syrup (you may use honey or agave or sugar)
¼ cup oil
⅓ cup semi-sweet chocolate chips
½ teaspoon baking powder
1 teaspoon vanilla extract
pinch of salt

How:

Preheat the oven to 350°F and line a baking sheet with parchment paper.

Grind the blanched almonds (see above-how to blanch almonds) to a smooth paste with the help of milk.

Add all ingredients in a bowl and mix well. Add the chocolate chips last.

Place about a tablespoon of the dough an inch apart from each other on the baking sheet and bake for 30 min or until the top of the cookies become slightly brown. 

The cookies will still be soft. Cool them and they'll harden.

Enjoy them anytime of the day.


Enhanced by Zemanta

Monday, February 3, 2014

Breakfast In a Cup

I don't know about you, but everyday morning is a rush time. And time is almost always cut short from breakfast! No time to sit down and have breakfast. Do you also want breakfast to go? This is the perfect recipe. Have it in your car, at the bus stop, train station anywhere. Also, the best part is: make it ahead, refrigerate or freeze, pop it in the microwave for a min and a satisfying breakfast ready in no time.

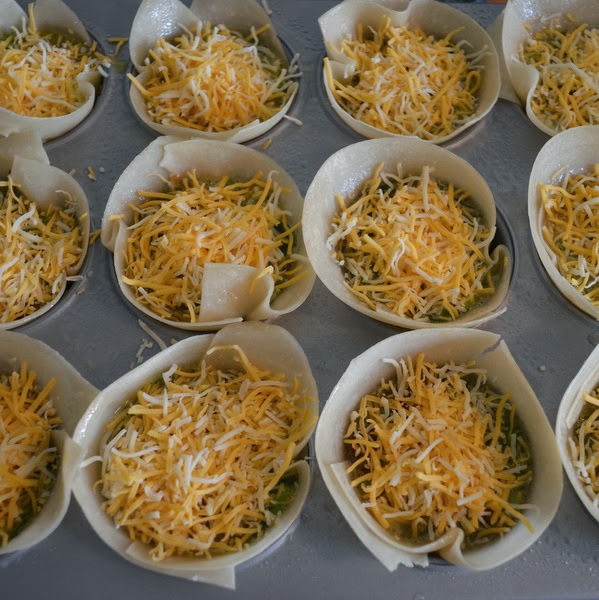
It has eggs, sausage and cheese in a tortilla cup. Satisfying and fulfilling breakfast!


Also, I'll let you in a little secret- I like this so much, I don't just eat it for breakfast. I love it as an afternoon snacks. Put some ketchup or hot sauce on it and enjoy :)


Doesn't this look pretty?


You can see all the sausage and egg in there. I used spicy italian sausage. If you are in no mood to eat spicy sausage in the morning, no problem, switch with breakfast sausage or even chicken or ham.


You need (for 12 cups):

9 eggs

1½ cup ground sausage (I used spicy italian sausage. You may use breakfast sausage, ground chicken, turkey or even ham)

6 tortillas (I used uncooked flour tortilla. You may use cooked flour tortilla, corn tortilla- for gluten free options)

⅓ chopped cilantro (You may skip this or use parsley or wilted spinach)

½ cup chopped scallions

1 cup shredded cheddar cheese (I used a mix of Cheddar and Jack)

Salt and pepper to taste

Cooking oil spray 

How:

Preheat the oven to 350°F.

Brown the sausage in a skillet on medium heat. Drain the excess fat on a paper towel and let it cool. If using breakfast sausage links, brown them and cut into small pieces.

In the meantime, whisk the eggs with scallions, cilantro with salt and pepper and keep aside.

Cut the flour tortillas into halves.

Start the assembly. Oil spray a 12 muffin pan. Place one half of the tortilla or two quarters or three pieces (whichever works for you) in the muffin cup overlapping such that the bottom of the cup is covered. Press the tortillas gently in to the cups. The edges of the tortilla should stick up higher than the muffin cup sides. Oil spray the inside of the tortilla cup.

Equally distribute the sausage in all the cups. Add the egg mixture over the sausage. Top it with cheese.

Bake for 20 min until the eggs are firm. Check with a toothpick.

If you want to store them for later, cool them and put in a large (gallon) freezer bag and store in your refrigerator for the next few days. Put it in the microwave for a min to warm them up.


For more options visit the BREAKFAST page: