Showing posts with label healthy. Show all posts

Sunday, May 18, 2014

Date balls with nuts, fruits and chocolate

This is something that I have been wanting to make and share for a few months now. These date balls have everything that I love:

Chocolate. Who doesn't like chocolate?

Roasted Nuts. Nuts about Nuts.

And

Dried fruits. My favorite- Cranberries. Sweet and tart. Perfect balance with the sweet dates.


The best thing about this is that this can be made differently every time.

You may use : White chocolate instead of semi-sweet chocolate.

Any combination of nuts or one kind only.

Any dried fruits- craisins, raisins, prunes.

Also, you may add seeds such as sunflower seeds or chia seeds

And, you may coat them with:

Powdered sugar, cocoa powder, almond meal, roasted coconut flakes.

These are the many reasons I love these date balls.

Oh, another thing, I eat these with my morning breakfast, after lunch as something sweet, as afternoon snacks and anytime in between.


So, for the no-recipe date balls (about 18 1inch balls), you need:

1 cup of pitted dates (tightly packed, about 16-18 dates)
¼ cup honey or maple syrup or agave syrup
⅓ cup roasted pistachios
⅓ cup roasted walnuts
⅓ cup craisins
¼ cup semi-sweet chocolate chunks
pinch of salt

For coating, I used powdered sugar, an equal mix of powdered sugar and cocoa powder, roasted coconut flakes.

This is how I did it:

Add the dates, honey or maple syrup, salt in the food processor and make a chunky paste of the dates. Add all the other ingredients and pulse just a few times to incorporate the nuts, the fruits and the chocolate chunks evenly in the date paste. This will be very sticky. Put this mixture in the refrigerator for a 2-3 hours. Put a little bit of oil in your palms before you role the mixture into balls. The oil will prevent it from sticking to your hands and will also help in the rolling process. Roll the date balls in your choice of coating and enjoy.


Sunday, April 27, 2014

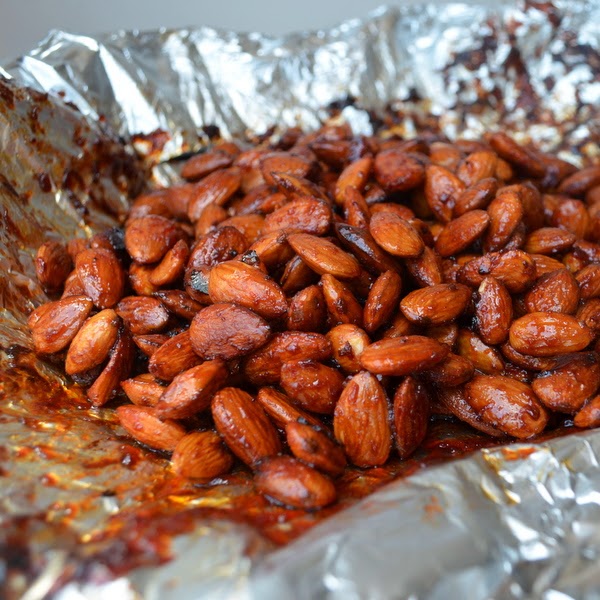
Sriracha Honey Almonds

Letter # 3


Dear Blog,

Today I want to write about buttons. No, not about the "small disk or knob sewn onto a garment, either to fasten it by being pushed through a slit made for the purpose, or for decoration", but about "a knob on a piece of electrical or electronic equipment that is pressed to operate it" that makes our life easy and saves our time. When I was growing up, we watched a black and white TV with shutter. It had exactly two knobs. One for the volume and one for the channel. And there were only two channels. I don't remember much but I remember that we were happy with whatever came on TV. I have such wonderful memories of that TV. When it would get too hot, the picture would shrink. Me and my sister would go fan the back side of the TV trying to cool it down, especially if there was a cricket game airing live. That TV gave up pretty soon and we welcomed a brand new color TV. With more buttons. Buttons to change the brightness, the contrast and the color of the picture. But, no remote. So, a change of volume every time would mean some one to take a long 5 feet walk from the sofa or the bed to the TV and change it manually. Whew, so much work! So, we got tired of walking that 5 feet soon enough and wanted a TV with remote. But, the TV was working great and buying a new TV just for a remote wasn't a good reason then. So, we designed our own remote. It was tricky. See, you have to choose a tree first, then an appropriate branch which must be straight and sturdy, yet not too thick. Our very own guava tree in our garden did a perfect job. Over the next few months, our thin tree branch (remote) changed in length from 3 feet to 5 feet. But, with increase in length came a problem. Lack of precision. Sitting 5 ft away from the TV, as you try to change the channel using a small little button at the bottom of the TV, most of the time we didn't hit the right button. Instead of walking 5 feet, we would still try to sit there and fix the other end of the twig to the desired button. Ha Ha. Remembering those moments is making me smile now. I am actually laughing out loud. Here, I am now sitting in front of a smart TV with two remote controls (TV and cable) and millions of channels to choose from and no visible buttons. Where does the sounds even come from this TV? Old TVs used to have ears from where the sound came. Good old TV with buttons - I will never forget you.

Missing old style TV,
Smita

Snacking on these as I write this and loving it.


Sriracha Honey Almonds

4 cups ( 1 lb ) Raw whole almonds
¼ cup sriracha sauce
¼ cup honey or maple syrup
3 tablespoon olive oil
½ + ½ teaspoon salt


This is how I made these wonderful snacks:

Preheat the oven to 350°F.

Mix the nuts, sriracha sauce, honey or maple syrup, oil and half teaspoon salt properly in a bowl. Spread them in an even layer on a foil lined baking sheet.

Bake them for 10 min. Take it out, stir the almonds around and bake for another 10 min.

Cool the almonds completely. Sprinkle half teaspoon of sea salt on the almonds. If by any chance they are not crunchy put them back in to the oven for another 5 min. But 20 min should be fine.

Enjoy snacking :)


Saturday, April 19, 2014

Healthy Lentil Crepes

Letter # 2

Dear Blog,

Wonderful thing happened last weekend that I would love to share.

I am a scientist. Most of my friends are scientists. My husband is a scientist. My very own sister and her husband are both scientists. So, you see, I don't often talk to non-scientists about science. I did once try to explain to my dad what my research is. After about 15 min, he asked me again - "what do you do?" I figured, he did not understand me at all. My PhD adviser used to always say that scientists must be able to explain their work in words that even their grandmother will be able to understand. As simple as it sounds, it is quite a difficult task. See, if your understanding about anything is deep, it is quite a virtue if you can explain it in few words or a few simple sentences without using technical words. For example, if you know a lot about electronics- and if I ask you the question "How do smart phones work?" or if you know a lot about economics and I ask very naively "How does stock market work?", you are a genius in my mind, if you can explain to anyone in a few sentences without using any technical words. Well, I am going on about this because, last weekend, I volunteered to be put up to this test. I, along with my colleague, talked to the general public about what we do as a scientist. It was a lovely experience. From undergraduates looking for a career path to above 70 years old enthusiasts visited my lab to peek into our daily work. I was nervous at first. But, as I started to talk about things I find exciting and interesting, I saw it reflected in their eyes. And you know, how I know that they understood what I said, they asked me questions which made the lab tour so interactive. It was very rewarding.  I can't believe that I have now volunteered to talk about science to general public now on a regular basis. I am excited. And nervous. But more excited.

And by the way, I research is in the area of breast cancer.

Love,
Not-so-crazy-scientist (Thank you, The Big Bang Theory - for making us look so not-crazy and sociable!)

P.S. I love "The Big Bang Theory"

P.P.S. I wonder when I laugh at their jokes if I am laughing at them or they are laughing at me! Hmm.

Now to the promised recipe-


 These lentil crepes are made with almost no oil. They are soft, and fold so beautifully.


You need (for about 10-12 crepes)

¼ cup yellow lentils or Moong/Mung dal
¼ cup rice flour (I used Bob's Red Mill's brown rice flour)
¾ cup water
½ inch ginger
½ teaspoon cumin powder
½ teaspoon salt
½ teaspoon sugar
¼ teaspoon cayenne pepper (optional)
pinch of turmeric (optional)
one or two drops of oil

This is how I did it-

Grind the lentils to a smooth paste with ¾ cup water and the ginger. Add all the other ingredients and mix well to make a smooth batter. Taste for salt.

Put your griddle on medium heat. When you griddle is ready, add just one or two drops of oil in the middle. With the help of a clean paper towel, spread that oil all around the griddle. The paper towel will soak most of the oil, but that is what makes these crepes healthy. DON'T throw the paper towel away.

 
Use an ice-cream scoop to pour batter in the middle of the griddle. Use the bottom surface of the ice-cream scoop to slowly spread the batter in circular motion starting from the middle to make a thin crepe. If you find it difficult to spread, lower the heat, so that you get more time to spread before the batter cooks.

Cook the crepe for about  30s to a minute depending on how much heat you are using. When the bottom surface of the crepe is cooked, it will come off the surface cleanly when you flip it. Cook the other side for another minute or two.

Before you pour batter again for the next crepe, just wipe your griddle with the paper towel that soaked up that drop of oil in the beginning. Continue with the wipe, pour, flip with the rest of your batter.

Enjoy warm savory lentil crepes with any curry or some indian pickle or just by itself with some ketchup. They are rich in protein and very filling.


Sunday, February 16, 2014

Crispy Spicy Chickpeas


There is something about the teatime in the afternoon. There's got to be something with tea. And it has to be savory or spicy, something crispy and crunchy, not to heavy to fill you up but yet very satisfying.
Pakodas or fritters are quite common afternoon snack to be enjoyed with tea but they are definitely not quite the healthy option. On the other hand is crispy spicy chickpeas-

Spicy- check

Crispy- check

Satisfying- check

Healthy- Oh yes, check


This weekend, with my husband away at a conference, what better way to spend an afternoon than a good book, hot ginger flavored tea and these crispy chickpeas.


These are commonly found in any Indian grocery store. The unflavored roasted chickpeas or the spicy kind. They are very tasty but I always fear that they probably add some food color or preservatives which may not be too good for you. It takes so little effort to make equally tasty snack at home then why not? And the best part is you can control the spices (the level of heat) and make it healthier with less oil. And gluten free (my husband was super happy about this).


You need: 

2 15 ounce cans of chickpeas (I used organic ones to make sure they are gluten free, you can pick any)
2 tablespoon oil
1 teaspoon salt
1 teaspoon cumin powder
1½ teaspoon chili powder or cayenne (Use less for milder heat levels)
1½ teaspoon smoked paprika
½ teaspoon black pepper

How:

Preheat the oven to 375°F

Drain the chickpeas in a colander and wash under running cold water. Transfer on to a plate lined with paper towels and pat dry. This is important to make the spices stick to them and to make them crispy.

Transfer to a bowl. Add all the other ingredients and mix properly, such that all the chickpeas are coated with oil and spices.

Line a baking tray with parchment paper. Spread the chickpeas in a single layer.


Put it in the oven for 1 hr. After an hour take them out and cool. Check if they are crispy, otherwise put them back in for another 10 min. [For the number of times that I have done this, it has taken somewhere between 1 hr to 1 hr and 15 min.]

Cool completely and store in an airtight container. It should have a long shelf life but I would never know. It never lasts more than a week in my house, they are so good :)


Enhanced by Zemanta

Wednesday, January 22, 2014

Pico de Gallo and Guacomole

Let me say this first: If you are one of those people who do not like cilantro or have it in your genes to hate cilantro, read no further 'coz cilantro is the star of my post today. Well, and the tomato, and the onion, and the jalapeños, and the lime- Yes, Pico de Gallo!


The perfect mixture of some veggies with loads of cilantro. I can top almost anything with this, but the best is some chips!


You have to make this fresh all the time. Well, you can make ahead a couple of hours, but thats the max, after a while it becomes a little runny with the salt softening all the veggies. If you plan to make ahead, I would suggest not to add the salt until you are ready to serve!

Now just in case, if you have made way too much and want to use it up otherwise, the best route is guacamole! But I am sure there won't be any left, but if by any chance your guests don't show up or something happens such that you are left with some pico de gallo at hand, add some avocado and you have guacamole made in a jiffy!


Guacamole 3 ways:

As I just mentioned, you can add avocado to your pico de gallo with some more lime juice and a little salt and you have guacamole ready in no time.

If you have some more time in your hand, go ahead and add a little bit of cumin powder *. Just the other day I was reading some blog saying that its a mistake to add cumin to guacamole. I got one thing to say, may be the blogger never tasted guacamole with cumin!

Want to be brilliant? Add a little bit of grated garlic along with or without cumin. You got guacamole with wonderful flavor now. Be careful not to go overboard with the garlic, it is added raw and too much of it will not taste good **.


For Pico de Gallo:

1 Jalapeño (remove the seeds and vein to control the heat)

1 Roma tomato (Use a form one, not soft and ripe)

1 small  or half of a medium red onion

1 cup of cilantro

Juice of half a lime

Salt to taste

How: Finely dice all the vegetables and mix with lime juice and salt. It's that easy!

For Guacamole:

1 ripe avocado

¾ cup of Pico de Gallo (Add more or less as you like)

*¼ teaspoon of freshly ground cumin powder (optional)

**1 small clove of garlic (optional)

Juice of half a lime

Salt to taste

How:

Cut the avocado in half and remove the pit. Scoop out the flesh of the avocado with a spoon. Using the back side of a fork, mash the avocado. This will leave the avocado a little chunky (I like chunky guacamole). Otherwise use the back side of a spoon to mash it to a paste.

Add the lime juice. This will prevent the avocado from turning brown. Don't skimp on the lime juice. My guacamole stayed green for at least 5 hours.

Add Pico de Gallo, garlic, cumin and mix well. Add salt to taste.

To store guacamole, cover it with clear wrap. The clear wrap should touch the guacamole such that there is no air between the guacamole and the wrap. Refrigerate and enjoy later!