Pages

Thursday, January 30, 2014

Lentil Dumplings Curry - masoor dal-er borar jhol/jhal

There are very few things that can be enjoyed as snacks and also again in a curry. This is one of them. But, you see, there is a problem. These snacks are so good, that rarely is there any leftover to turn into a curry. Oh, sorry I should have mentioned earlier - I am talking about my delicious Red Lentil Fritters!


If you have tried them already, then you know that it is difficult to resist these little perfect morsels. In fact, I made these 3 times one week, with the hope that once I'll be able to make curry with them. It was the fourth time that I had to keep it away from my husband to be able to make the curry. He wasn't very happy initially when he learnt that I am keeping it away from him. But later, he appreciated my effort saying "I almost forgot what this curry taste like, this is awesome!"


The name "lentil fritters curry" didn't quite seem right. These fritters are crispy outside and soft inside. But once they are dipped in the tomato curry, they soak up the curry with all the flavors of spices like a sponge and become soft pillows. Hence the name "lentil dumplings curry". 


You need (serves 4-6):

Follow the recipe of "Red lentil fritters" to make about 50 fritters.

1 medium sized Russet potato, chopped

1 medium sized yellow onion, diced

1½ tablespoon of fresh ginger paste

1½ teaspoon fresh cumin powder

2 green chilis or red chili powder (use according to your tolerance of heat)

1 medium tomato. chopped

pinch of turmeric

salt

Canola/vegetable oil for cooking

How:

Heat oil in a deep pan on medium heat. Add the green chilis. Add the potato pieces and fry them with salt and turmeric.

When the potato pieces are brownish outside, add the onion, ginger, cumin, (and chili powder), salt to taste, mix well and fry. This may take some time. 

When the onions are soft and cooked and the raw smell of spices is gone, add the tomato. Cook till it is soft and mixed well with everything else. 

Add water to cover the potatoes and simmer till the potatoes are cooked.

When the potatoes are done, add the fritters. Add more water till all the fritters are covered. Don't worry about adding too much water, the fritters will soak all up. Taste for salt and cover with a lid. Wait for 5-10 min.

Garnish with cilantro and serve hot with rice/ indian bread.


Tuesday, January 28, 2014

Strawberry Banana Smoothie


Oh, there are some things that need no introduction, no stories, nothing. It is so simple and elegant. Just one thing- it is so soooo good!


Just another thing: This will be so lovely on Valentine's day morning. Right? Lovely pink color with the heart shaped strawberry slice at the edge of the cup. #Romantic


Oh! and another thing: You can even make a milkshake with this. Just swap the milk with some vanilla ice-cream!


And one final thing (I promise, it's the last thing, next is the recipe): This is dairy free- as I used almond milk. But go with the regular milk if you are ok with it.

So, here's what you need (Serves 2):

1 ripe banana

1 cup of strawberry syrup  OR 10-12 large strawberries and 2 tablespoon sugar

½ cup almond milk (You may use rice milk or regular milk- keep in mind the rice milk is much thinner in consistency than almond milk, so add according to your desired consistency)

1-2 drops of vanilla extract

How:

Put the banana in the blender and blend it. It will be like a cream (This prevents the banana to be chunky in your smoothie). Then add all the other ingredients and blend to a smooth consistency. Add more sugar if you like you like your smoothie to be more sweet. It also depends on how ripe your strawberries are. Also add more milk if you would ike a thinner smothie. Chill and enjoy it with some chocolate shavings on top. I don't mind a little chocolate in the morning. What do you say?


If you love strawberries as much as I do, you may also like:

Maple Walnut Muesli with Strawberries

Gluten free, Dairy free, Eggless Pancakes with Strawberry Syrup


Enhanced by Zemanta

Sunday, January 26, 2014

Spinach Salad with Chili-Lime-Maple-Cilantro Dressing

It was just one of those days when all you want is a simple salad. I am not a big fan of salads unless I like the dressing. Oh yes, the dressing is very important for me. In fact, I have salads just for the dressing.


Now, I like cilantro, no wait, I LOVE cilantro. So if I want to enjoy a salad, I had to make a cilantro dressing. Got to be a little sweet, little tangy, little heat with a cilantro background. Made chili-lime-maple-cilantro dressing and enjoyed it with a refreshing spinach salad with mandarins and walnuts. Loved it. Loved the dressing!


I put the rest of the dressing to good use later: marinated some chicken with this and some garlic, onions and carrots and baked them (Will post later!). Wonderful dinner served with such ease. This dressing is so easy to put together, that you can make this any day, any time.


You need:

For dressing:

1 cup cilantro (Do not need to pick the leaves, only remove the hard stem).

Juice and zest of 1 lime

1 green chili (Use none or less or more depending on how much heat you like. I personally recommend a little heat, nicely balances the lime and the sweet taste of maple)

2 tablespoon maple syrup

1 tbsp apple cider vinegar

pinch of salt

⅓ cup extra virgin olive oil

For salad:

A handful of fresh baby spinach leaves

1 mandarin, peeled and cut into small pieces

¼ cup toasted chopped walnuts

Few slices of red onion 

How:

Put all the ingredients of the dressing in a blender. Blend it to smooth consistency. Taste for salt and lime. Add more if you like. Drizzle over the spinach with mandarin and walnuts. Enjoy!


If you like cilantro as much as I do, you may also like:


Wednesday, January 22, 2014

Pico de Gallo and Guacomole

Let me say this first: If you are one of those people who do not like cilantro or have it in your genes to hate cilantro, read no further 'coz cilantro is the star of my post today. Well, and the tomato, and the onion, and the jalapeƱos, and the lime- Yes, Pico de Gallo!


The perfect mixture of some veggies with loads of cilantro. I can top almost anything with this, but the best is some chips!


You have to make this fresh all the time. Well, you can make ahead a couple of hours, but thats the max, after a while it becomes a little runny with the salt softening all the veggies. If you plan to make ahead, I would suggest not to add the salt until you are ready to serve!

Now just in case, if you have made way too much and want to use it up otherwise, the best route is guacamole! But I am sure there won't be any left, but if by any chance your guests don't show up or something happens such that you are left with some pico de gallo at hand, add some avocado and you have guacamole made in a jiffy!


Guacamole 3 ways:

As I just mentioned, you can add avocado to your pico de gallo with some more lime juice and a little salt and you have guacamole ready in no time.

If you have some more time in your hand, go ahead and add a little bit of cumin powder *. Just the other day I was reading some blog saying that its a mistake to add cumin to guacamole. I got one thing to say, may be the blogger never tasted guacamole with cumin!

Want to be brilliant? Add a little bit of grated garlic along with or without cumin. You got guacamole with wonderful flavor now. Be careful not to go overboard with the garlic, it is added raw and too much of it will not taste good **.


For Pico de Gallo:

1 JalapeƱo (remove the seeds and vein to control the heat)

1 Roma tomato (Use a form one, not soft and ripe)

1 small  or half of a medium red onion

1 cup of cilantro

Juice of half a lime

Salt to taste

How: Finely dice all the vegetables and mix with lime juice and salt. It's that easy!

For Guacamole:

1 ripe avocado

¾ cup of Pico de Gallo (Add more or less as you like)

*¼ teaspoon of freshly ground cumin powder (optional)

**1 small clove of garlic (optional)

Juice of half a lime

Salt to taste

How:

Cut the avocado in half and remove the pit. Scoop out the flesh of the avocado with a spoon. Using the back side of a fork, mash the avocado. This will leave the avocado a little chunky (I like chunky guacamole). Otherwise use the back side of a spoon to mash it to a paste.

Add the lime juice. This will prevent the avocado from turning brown. Don't skimp on the lime juice. My guacamole stayed green for at least 5 hours.

Add Pico de Gallo, garlic, cumin and mix well. Add salt to taste.

To store guacamole, cover it with clear wrap. The clear wrap should touch the guacamole such that there is no air between the guacamole and the wrap. Refrigerate and enjoy later!


Sunday, January 19, 2014

Gluten free, Dairy free, Eggless Pancakes with Strawberry Syrup

This is not by choice. My husband has recently moved to a gluten free diet. Also quit dairy and eggs. He is doing great with these restrictions. But this has challenged my cooking, specially breakfast.

I didn't have much knowledge about gluten free diet until recently. Well, in short, you can't have oats, cereal, granola, pancakes, cookies or anything for that matter unless it is specially made gluten free.


For now, we are buying gluten free cookies and cereal. We were also buying gluten free pancakes mixes. They don't taste quite like pancakes nor do they look like one. They look brownish rather than yellowish!

Now in a family of two (me and my husband), I am not making two different breakfasts, hence I started eating gluten free pancakes too. Dissatisfied by a few of the gluten free pancakes mixes available at the store, I started looking up recipes online and perfecting them over time. Here are the things I learned:

Flour: If you plan to buy all purpose flour mix, King Arthur has a nice gluten free all-purpose flour. However, if you want to make your own mix, some of the great gluten free blogs such as Gluten-free goddess, gluten free on a shoe string, gluten free girl are great places to get ideas.

Dairy free milk: Rice milk and almond milk are great options. However note that rice milk is thin (quite like skimmed milk) while almond milk is thicker (quite like full fat milk) in consistency. So, you might need to adjust recipe accordingly.


We were kind of getting tired of having maple syrup with pancakes every morning. 

The other day, my grocery store had the most beautiful looking strawberries. Also, I love strawberries! Made a very simple syrup with strawberries. Loved them on our pancakes. In fact, it was so good, I had a few spoonfuls of syrup right out of the jar. Shhh!


You need (Makes 8 pancakes):

For pancakes:

1 cup of  GF all-purpose flour (I used King Arthur's)

2 teaspoon baking powder

¼ teaspoon salt

2 tablespoon maple syrup (You can use sugar or honey- note that the sweetness will differ)

1 teaspoon vanilla extract 

¼ cup unsweetened apple sauce (I used Mott's natural apple sauce. You can definitely use sweetened and flavored apple sauce, just note to adjust sweetness)

¾ dairy free milk (I used unsweetened almond milk here. I also use rice milk at times. Use as much as needed for the mix to come to the right consistency.)

For strawberry simple syrup:

1 lb strawberries, hulled, chopped

⅓ cup granulated sugar

⅓ water

pinch of salt

Method:

For pancakes:

Add all the ingredients in a bowl except milk and mix (I don't bother to separate dry and wet ingredients). Add the milk and whisk until there are no lumps. I first added ½ cup milk, and then slowly added ¼ cup milk to reach the right consistency (not too thick, not too runny, somewhere in the middle is the right consistency.)

Put a griddle or pan on your stovetop on medium heat. Add ¼ cup of the batter for each pancake.

Cook for a few minutes until you see bubbles in the middle of the pancake, takes a minute or two. Flip the pancake and cook the other side for about 30 seconds.

Serve with fresh fruits and homemade strawberry syrup.

For syrup:

Prepare the strawberries. Add the strawberries, sugar, water and salt in a small sauce pan on medium heat. 

Simmer for 15 min or until the sugar is dissolved and the berries become soft.

Transfer to a blender and blend to a smooth syrup. Chill before serving.


Enhanced by Zemanta

Monday, January 13, 2014

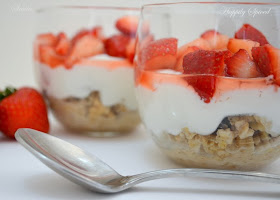
Maple Walnut Muesli with Strawberries

Walking through a farmer's market on one fine sunday morning introduced me to this Swiss breakfast cereal-muesli. I devoured that small little cup that morning. I figured it has oats, yogurt and fruits and exclaimed "Honey, I can make this at home" to my husband.


Coming home, the research started. Then I came to know that muesli does not just have oats, these are oats not cooked but soaked. Love it! Breakfast I don't have to cook. And, you can make this is large quantities, store it in your refrigerator and have it another time (those crazy - I am late- weekday mornings!).


I have made muesli a number of times but it wasn't quite hitting the right spot. It tasted great but something was missing. Then reading the muesli recipe on "Back to Basics" cookbook by Ina Garten gave me the idea of adding Granola to it. Right, it was missing the crunch. Without the granola it's too mushy mushy!

Coming to the flavor of muesli, it's very common to use strawberry flavored yogurt. That's great but there's nothing like fresh berries. Wouldn't you agree? I also added nuts for more bite into this recipe. Thinking of which nut to add, I thought of walnuts and my favorite flavor to go with that is maple. Hence, the maple walnut muesli. On a side note-I love maple walnut ice-cream!


You need:

¼ cup instant oats (I used Quaker 1-minute oats)

¼ cup granola (I used Quaker granola with raisins)

2 tablespoon chopped walnuts

1½ tablespoon pure maple syrup

pinch of salt

¼ cup hot water (I used the hottest water from my tap)

4-6 large strawberries, hulled and chopped/quartered

1½ teaspoon sugar

7oz plain greek yogurt (I used one 7 oz container of Chobani plain greek yogurt)

½ teaspoon vanilla extract (optional)

Method:

Soak the oats, granola, walnuts in the hot water with maple syrup and pinch of salt for 15 mins. While the oats are soaking, prepare the strawberries, add the sugar to them and allow to macerate. Mix the vanilla with the yogurt. Separate the oats in two parts, top with yogurt and berries and serve!


Saturday, January 11, 2014

Red Lentil Fritters

The clock turns three in the afternoon and I think- snacks!


I am not sure if its me or the bengali in me that thinks snacks = deep fried savory goodies to be had with a nice cup of hot tea or coffee in the afternoon. However, the adult in me knows that its not good to have deep fried food everyday. But, I am too young to give up that, aren't I? Hmm.


How about lentil fritters? They are loaded with protein, doesn't that make them good? Well, I can bake them instead of frying. But doesn't frying make everything taste way better than baked? Don't answer that....


The winter is in no hurry to leave. So, pull that blanket a little closer and snuggle your toes into your socks as you bite into these crispy lentil fritters!


It is quite the Indian custom to beat the cold or the rain with hot tea, fried food, good company and good humor. Unfortunately, San Diego (where I live) neither gets much rain nor gets much cold. Gosh, does that prevent me from savoring these from time to time. NO!


Dunk these in some ketchup or your favorite tomato sauce or cilantro chutney. No need to bite into these 'cause one little one is one perfect morsel. (too many "one"s in one sentence)


There is nothing in this recipe that you won't have in your pantry which qualifies this for an any day recipe. These fritters are quite multi-talented I would say. You can enjoy them as snacks or as appetizers or use them in a curry (will post recipe sometime). These can be very good party food too!

Here come's the recipe:

You need:

¾ cup red lentils

½ cup diced yellow onion

2 green chilies, minced (add more or less according to your tolerance of heat- may substitute with chili powder)

½ teaspoon nigella seeds/kalonji/kalo jeera

salt to taste

pinch of turmeric

pinch of baking soda

½ cup chopped cilantro

Vegetable/Canola oil for frying


Let's cook:

Soak the lentils for 3-4 hours. Grind them to a smooth paste. If using dry lentils (didn't get a chance to soak them-which happens to me all the time) grind them with the help of water to bring it to smooth consistency.

Add all the other ingredients (except oil) and whisk well. [Something I do every time I use baking soda in fried food is that I whisk the batter for a few minutes- I think it helps the fritters to be airy and crispy.]


Put a shallow pan with half an inch of vegetable/canola oil on medium heat.

Add a teaspoon of the batter to the hot oil. Fry on one side for a few minutes and then fry the other side for another few minutes till they are reddish in color.

Soak the excess oil on a paper towel and serve warm with ketchup or chutney.

Use the leftovers (if any) in delicious curry- these fritters become soft pillows soaked in curry- Lentil Dumplings Curry


You may like: Lentil Dumplings Curry


Wednesday, January 8, 2014

Simple and Tasty Potato Fans

Potato is one humble adaptable vegetable that has the ability to change moods, fulfill cravings, bring comfort and last but not least, be very delicious. There is nothing that a little potato can't do. Oh, forget the carbs for a moment and think of the crunch of fries and chips or the creaminess of mashes potatoes!

If you are in potato heaven right now (as I am!), this one will surely satisfy you. Why, it has crunch on the outside, softness inside.


Why did I not know about this recipe before?

It was only a matter of chance that I came across this on the internet (I am looking for recipes all day long!). The best thing about this is- you can make it with any flavors you want. I made it very simple with just salt and pepper. But go ahead and use your imagination- garlic rosemary, only garlic, only rosemary, thyme, lemon pepper, red chili powder, anything you want. Isn't that great?

These potato fans crisp up on the top and stay soft on the bottom. They have multiple personality.

Serve it as a nice potato side dish or enjoy just as it is right out of the oven (like me!).

Above all, easy to make!


Ingredients:

Potatoes (as many as you want to make)- I used small russet potatoes. I love them because they are more starchy than others. You can use yukon gold potatoes or red potatoes too.

Extra Virgin Olive oil (approx. a tablespoon per medium sized potato)

Salt (as per your taste)

Freshly cracked black pepper (as per your taste)

Freshly squeezed lime juice

Method:

Preheat the oven to 425°F.

Slice the bottom off potatoes so that they sit on your cutting board. (Don't you roll away potato!)

Place two chopsticks or pencils (from your kid's school bag) and place them on both side of the resting potato. The chopsticks are going to prevent you from completely slicing the potato - hence the fans. They are your friends. Trust them. They will guide you to potato heaven!


Cut crosswise at about ⅛ inch (2-3mm) intervals, cutting to within ¼ inch at the bottom guided by your friends (read chopsticks).

Place the potatoes in cold water to prevent them from turning brown (brown potatoes are not so tempting).

When all the potatoes are fanned, wash them thorough under cold running water. Try to wash away all excess starch. Open up the slits a bit with your fingers and let the running water flow. Yukon potatoes with less starch will need less washing.

Drain water completely and pat them dry with your kitchen towel. Dry potatoes will crisp up better.

Mix olive oil, salt and pepper in a separate bowl. Add the mix slowly to the potatoes trying to get it in between the slits.

Arrange the potatoes on a foil lined sheet pan with the cut side up. Put the small piece of potato that you sliced off in the very beginning underneath. This will help the potato to open up like a fan.


Cover the potatoes with foil and bake for 30 min.

Remove the foil and bake for another 15 min until they are tender and golden and crisp on top.

Remove from oven. Sprinkle some black pepper and lime juice and serve hot.

TIP: #1 After slicing the potatoes, with your thumb press the potatoes from the flat side to open up the fan.

#2 You can prepare the potatoes (slicing and washing) ahead and store them in cold water.


Inspired from: Ina Garten's recipe


Monday, January 6, 2014

Yellow Lentils with Veggies/ Sabji diye Moong Dal

This is one of my favorite dal recipes. I usually make this every time I have guests at home. It is easy, super tasty and very healthy with all the veggies in it. The touch of coconut at the end add a sweetness which just makes it perfect!

Have it any way- thick and mushy with rice/roti or thin to enjoy it like lentil soup!


There are many types of lentils or dals used in Indian cooking. Besides red lentils or masoor dal, Yellow lentils/ Moong/ Mung Dal is also very commonly used in a Bengali household. Although this recipe is a vegetarian version, moong dal is very commonly made with fish too. This recipe is simple and easy to make. Enjoy!


Ingredients:

¾ cup yellow lentils/moong dal

½ cup carrots chopped

½ cup green beans chopped

½ cup green peas

1 tomato diced

1 dried red chili

1 teaspoon cumin seeds

pinch of turmeric powder

1½ tablespoon ginger paste

¼ cup shredded coconut

salt

sugar (according to taste)

oil for cooking


Method:

Roast the lentils in a deep sauce pan over medium heat until it turns golden brown. It will smell toasty.

Add water and boil the lentils. Keep it thick and mushy and not runny (if you want to serve with rice).  Takes about 20-30 minutes. Otherwise make it thin to enjoy like lentil soup. For soup, boil till the lentils lose their shape. You can also mash them with the back of your ladle.

In the meantime, add oil in another pan on medium heat. Add the cumin seeds, dried red chili, ginger paste, turmeric and fry the spices. Once the raw smell of ginger is gone, add the vegetables except tomato and coconut. Add salt.

After the vegetables are fried along with the spices, add the tomato and stir. Cook for another few minutes till the tomato is soft and mixed with the spices.

Add the boiled lentils. Mix thoroughly. Simmer for a few more minutes on medium heat for the spices to incorporate nicely with the lentils.

Add the coconut. Taste for salt. The coconut will add some sweetness to the lentils but you can add some sugar (I do!) to have a nice balance of salty and sweetness in the final taste.

Garnish with chopped cilantro and serve hot with rice or roti or enjoy just as it is like a soup!